
Aaj ke digital era mein, coaching institutes aur educators ke liye ek high-quality Online Class Studio Setup hona ab ek choice nahi, balki zaroorat ban chuka hai. Agar aapka video clear nahi hai ya aawaz gunj rahi hai, toh students ka engagement drop ho jata hai.
Agar aap 2026 mein ek professional, future-ready online teaching studio banana chahte hain, toh yeh absolute ultimate guide aapke liye hai. Hum baat karenge complete equipment checklist, costing, aur step-by-step setup process ki.
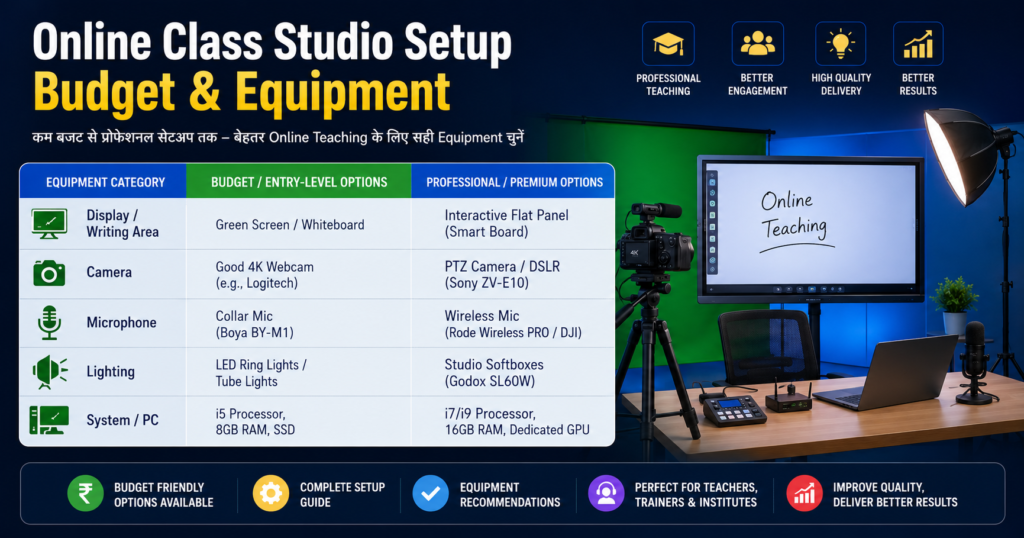
Online Class Studio Setup Budget & Equipment
Agar aapke paas samay kam hai, toh niche diye gaye table se aap ek basic overview le sakte hain:
| Equipment Category | Budget / Entry-Level Options | Professional / Premium Options |
| Display / Writing Area | Green Screen / Whiteboard | Interactive Flat Panel (Smart Board) |
| Camera | Good 4K Webcam (e.g., Logitech) | PTZ Camera / DSLR (Sony ZV-E10) |
| Microphone | Collar Mic (Boya BY-M1) | Wireless Mic (Rode Wireless PRO / DJI) |
| Lighting | LED Ring Lights / Tube Lights | Studio Softboxes (Godox SL60W) |
| System / PC | i5 Processor, 8GB RAM, SSD | i7/i9 Processor, 16GB RAM, Dedicated GPU |
1. The Core Element: Interactive Flat Panel (Smart Board)
Ek modern smart classroom setup ki jaan hota hai uska Interactive Flat Panel (IFP). Yeh aapke traditional blackboard aur projector dono ko replace kar deta hai.
- Size Matters: Online teaching ke liye 65-inch, 75-inch, ya 86-inch ke 4K Smart Boards sabse best hote hain. Agar aapka room chota hai, toh 75-inch ek sweet spot hai.
- Key Features to Look For: Android + Windows dual OS support, anti-glare glass (taki lights ka reflection board par na pade), aur minimum 4GB RAM / 32GB Storage.
- Top Brands: Maxhub, LG, BenQ, aur Evota India mein kaafi popular hain.
2. Audio Setup: Clear Voice Hai Sabse Zaroori
Aapka video thoda average chal sakta hai, lekin agar aapki audio kharab hai, toh students 5 minute bhi nahi rukenge. Professional teaching studio ke liye sahi mic chunna crucial hai.
- Wireless Lapel Mics: Agar aap board ke samne chal-fir kar padhate hain, toh Rode Wireless GO II ya DJI Mic best hain. Yeh aapko wire-free movement dete hain.
- Budget Option: Agar budget tight hai, toh Boya BY-M1 ya JBL Commercial collar mic se shuru karein.
- Acoustics Note:Pro Tip: Room mein khali deewarein aawaz ko echo karti hain. Apne studio mein curtains, carpets, ya acoustic foam panels lagayein taki aawaz ekdum crisp aur studio-quality lagne lage.
3. Video Capture: Camera Ka Sahi Chunaav
Aapki video quality hi aapke brand ki value define karti hai. Digital teaching studio ke liye aapke paas do behtareen options hain:
Option A: PTZ (Pan-Tilt-Zoom) Cameras
Yeh cameras specially online teaching aur hybrid classrooms ke liye bane hain. Inhein aap remote se control kar sakte hain, zoom kar sakte hain, aur kuch advanced PTZ cameras mein toh AI Human Auto-Tracking hoti hai—yani aap jahan jayenge, camera aapko automatic follow karega.
Option B: Mirrorless / DSLR Cameras
Agar aapko ultra-premium cinematic look chahiye jahan background thoda blur ho aur colors bohot sharp hon, toh Sony ZV-E10 ya Canon EOS R50 jaise mirrorless cameras ka use karein. Inhe ek HDMI Video Capture Card ke zariye PC se connect kiya jata hai.
4. Studio Lighting: No Reflection, Just Perfection
Smart board setup mein sabse badi problem hoti hai reflection (glare). Agar lights sahi jagah nahi lagi hongi, toh board par chamak aayegi aur students ko text nahi dikhega.
- Three-Point Lighting System: Aapko apne chehre par dono side se 45-degree angle par do main lights (Key Light & Fill Light) chahiye. Iske liye Godox SL60W ya square LED panel lights ka use karein jismein softbox laga ho. Softbox light ko diffuse karta hai, jisse hard shadows aur board par reflection nahi banti.
- Top Lighting: Ek light theek board ke upar lagayein jo aapke sir aur shoulders par pade (Hair Light).
5. PC / Laptop & Software Configuration
Sari feeds (Camera, Mic, Smart Board) ko process karne aur live stream karne ke liye ek takatvar PC ki zaroorat hoti hai.
- Minimum Specifications:
- Processor: Intel Core i5 (12th Gen ya higher) ya AMD Ryzen 5.
- RAM: 16 GB DDR4/DDR5.
- Storage: 512 GB NVMe SSD (HDD avoid karein).
- Graphics Card: Dedicated GPU (jaise Nvidia GTX 1650 ya RTX series) live streaming ko smooth banata hai.
- Software Ecosystem: Live streaming aur recording ke liye OBS Studio sabse best aur free open-source software hai. Iske alawa aap Zoom, YouTube Live, ya apne coaching ki custom white-label mobile app ka use kar sakte hain.
6. Hybrid Classroom Setup & Infrastructure
Agar aap offline aur online dono students ko ek sath padhate hain (Hybrid Learning Setup), toh aapko ek Instructor Monitor ki zaroorat padegi. Yeh ek extra monitor hota hai jo aapke samne deewar par lagaya jata hai, jismein aap live chat, students ke doubts, aur apni stream ka preview dekh sakte hain bina peeche mude.
- Internet: Minimum 100 Mbps ki FTTH (Fiber) Broadband Line lein jismein upload speed constant mile. Hamesha backup ke liye ek secondary connection zaroor rakhein.
- Power Backup: Ek achha Online UPS lagayein taki light jaane par aapka smart board ya live stream sudden band na ho, jisse data aur equipments dono safe rahein.
Step-by-Step Studio Installation Process
- Room Selection: Ek aisa kamra chunein jahan bahar ka shor (traffic, logon ki aawaz) sabse kam aata ho.
- Acoustics & Flooring: Kamre mein niche carpet bichayein aur deewaron par heavy curtains lagayein.
- Smart Board Mounting: Smart board ko deewar par ground se lagbhag 3.5 se 4 feet ki unchai par mount karein (teacher ki height ke mutabik).
- Lighting Setup: Board ke theek samne koi light na rakhein. Lights ko hamesha ceiling par ya stands par side angles par lagayein.
- Testing: Live jaane se pehle OBS Studio mein 10 minute ki demo recording karke audio aur video levels check karein.
Investment Jo Growth Degi
Ek professional studio setup for teachers shuruat mein thoda expensive lag sakta hai, lekin yeh aapke coaching institute ko ek pan-India brand banane ka rasta kholta hai. Sahi equipment aur acche content ke sath, aap lakhon students tak asani se pahonch sakte hain.
Agar aapka budget kam hai, toh aap ek achhe webcam, collar mic, aur green screen se shuru kar sakte hain, aur dheere-dheere smart board setup par upgrade kar sakte hain.
FAQ: Frequently Asked Questions
Q1. Online teaching studio setup karne ki total cost kitni aati hai?
Ek basic functional setup (Webcam + Laptop + Normal Mic + Lights) ₹50,000 – ₹70,000 mein ho jata hai. Wahi agar aap Smart Board, PTZ Camera, aur Professional Lights ke sath ek premium setups chahte hain, toh cost ₹2,500,000 se ₹4,000,000 tak ja sakti hai.
Q2. Kya smart board par reflection se bachne ke liye koi special light aati hai?
Haa, aapko diffuse lighting ya softbox panels ka use karna chahiye. Saath hi, hamesha Anti-Glare (AG) Glass wala hi Interactive Flat Panel khareedein.
Q3. Live teaching ke liye kaun sa software best hai?
OBS Studio (Open Broadcaster Software) sabse best, secure aur free software hai jismein aap multi-camera setups, graphics, aur branding overlays asani se manage kar sakte hain.


