आज YouTube पर professional दिखने के लिए सिर्फ महंगा camera खरीद लेना काफी नहीं है। Viewer को आपकी video तभी premium महसूस होती है जब camera, microphone, lighting, background, framing और recording workflow एक साथ सही तरीके से काम करें। यही वजह है कि Technical Yogi YouTube Studio Setup जैसे real creator setups नए YouTubers, teachers, coaches और content creators के लिए useful learning reference बन जाते हैं।
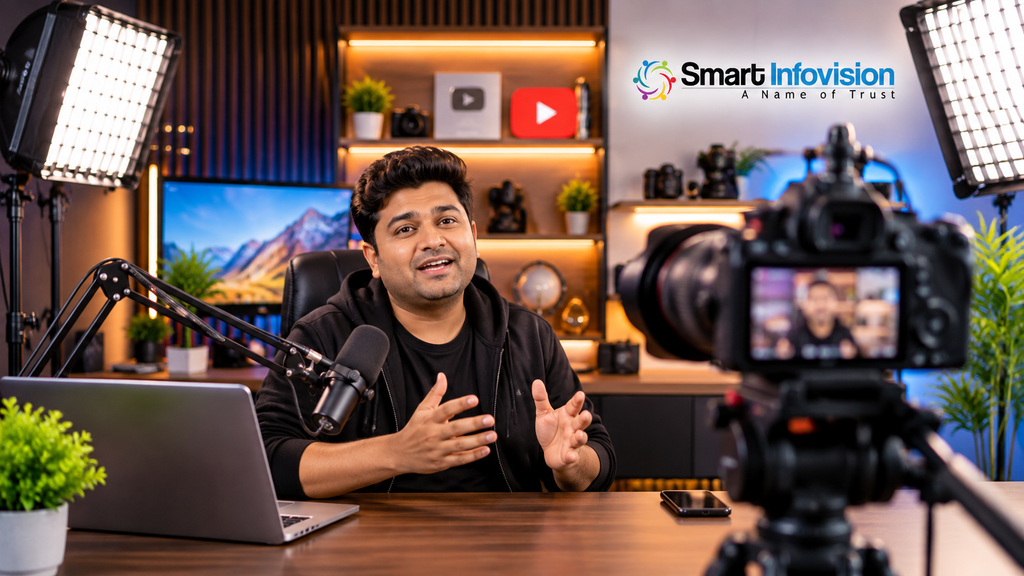
Technical Yogi ने 26 जनवरी 2026 को अपने YouTube channel पर “How I Shoot My YouTube Videos (Full Setup)” नाम से एक behind-the-scenes video publish किया, जिसमें उनका home YouTube studio, camera, microphone, lighting और overall shooting workflow दिखाया गया है। यह इसलिए महत्वपूर्ण है क्योंकि हमें केवल final YouTube video नहीं दिखती, बल्कि उस video के पीछे काम करने वाला production environment समझने का मौका मिलता है।
यह guide Technical Yogi के publicly available setup को एक reference point मानते हुए यह समझाती है कि 2026 में एक professional YouTube Studio Setup कैसे plan किया जा सकता है। जहाँ किसी exact equipment model की reliable public confirmation उपलब्ध नहीं है, वहाँ हम कोई अनुमान नहीं लगाएंगे। इसके बजाय camera selection, audio, lighting, Interactive Flat Panel, AI camera, online teaching, hybrid classroom और complete studio ecosystem को practical तरीके से समझेंगे।
इसका उद्देश्य आपको किसी creator का setup blindly copy करवाना नहीं है। असली उद्देश्य यह समझना है कि professional studio में कौन-सा component कौन-सी problem solve करता है और अपने budget, room, teaching style तथा content format के अनुसार सही combination कैसे बनाया जाए।
Technical Yogi का Studio Setup हमें क्या सिखाता है?
एक established creator का studio देखने पर पहली नजर अक्सर camera या lights पर जाती है। लेकिन professional production की असली ताकत individual product में नहीं, बल्कि पूरे workflow में होती है।
Technical Yogi के January 2026 setup video की description के अनुसार उनका workflow camera, mic, lights और complete studio shooting process को cover करता है। उनका पुराना 2021 behind-the-scenes video भी DSLR, lens, mic, tripod, lights, softbox, back light और अन्य studio elements का उल्लेख करता है। इससे एक interesting evolution दिखाई देता है: creator studio एक बार बनाकर भूल जाने वाली चीज नहीं है; content quality और workflow के साथ studio भी evolve होता है।
यही lesson teachers और educational creators पर भी लागू होता है। शुरुआत में आपको एक functional camera, clean microphone और balanced lighting की जरूरत हो सकती है। बाद में digital board, PTZ camera, teleprompter, acoustic treatment, dedicated recording PC या OPS और hybrid teaching infrastructure add किया जा सकता है।
इसलिए सवाल “सबसे महंगा camera कौन-सा है?” नहीं होना चाहिए। सही सवाल है—“मेरे content के लिए ऐसा studio ecosystem कौन-सा है जिसमें video clear हो, आवाज professional हो, workflow आसान हो और future upgrades possible हों?”
2026 में Education और Creator Market क्यों बदल रहा है?
Education अब classroom की चार दीवारों तक सीमित नहीं है। एक teacher एक ही lecture को physical classroom में पढ़ा सकता है, उसे record कर सकता है, YouTube पर publish कर सकता है, LMS पर upload कर सकता है और live online students के साथ interact भी कर सकता है।
इस बदलाव ने teacher और content creator के बीच की traditional boundary को काफी कम कर दिया है।
आज एक coaching institute के लिए studio केवल YouTube videos बनाने की जगह नहीं है। वही setup admissions content, recorded courses, live classes, webinars, student doubt sessions, Shorts, promotional videos और faculty branding के लिए इस्तेमाल हो सकता है।
इसी तरह independent educator के लिए studio केवल visual quality improve नहीं करता। एक अच्छी तरह designed workflow recording का friction कम करती है। Teacher को हर class से पहले camera, mic और lighting दोबारा assemble नहीं करनी पड़ती। Content production repeatable हो जाता है।
यही कारण है कि modern studio planning में hardware से पहले workflow समझना जरूरी है।
Traditional Teaching क्यों बदल रही है?
Traditional blackboard या whiteboard teaching अभी भी effective हो सकती है, लेकिन उसकी कुछ natural limitations हैं। जो explanation classroom में हुई, वह अक्सर वहीं खत्म हो जाती है। दूर बैठे students उसी session को access नहीं कर पाते। Diagrams और multimedia content integrate करना मुश्किल हो सकता है। Lecture को तुरंत digital asset में बदलना भी आसान नहीं होता।
Interactive Flat Panel और digital teaching ecosystem इस limitation को बदल सकते हैं।
Teacher PDF खोल सकता है, presentation दिखा सकता है, diagram annotate कर सकता है, video explain कर सकता है और जरूरत पड़ने पर उसी session को camera के माध्यम से record या stream कर सकता है।
लेकिन केवल Digital Board लगा देने से classroom automatically professional studio नहीं बनता।
यहीं technology gap शुरू होता है।
असली Technology Gap कहाँ है?
बहुत से creators पहले camera खरीदते हैं। Teachers पहले digital board खरीदते हैं। Podcasters पहले microphone खरीदते हैं। बाद में पता चलता है कि room में lighting खराब है, echo ज्यादा है, camera placement गलत है, board पर reflection आ रहा है या audio और video synchronization complicated हो रही है।
यह product problem से ज्यादा planning problem है।
एक professional studio में camera का field of view, teacher की movement, microphone pickup, board position, lighting angle, electrical points, background depth, acoustic behavior और recording software—सब एक-दूसरे से जुड़े होते हैं।
उदाहरण के लिए, Interactive Flat Panel पर strong frontal light गलत angle से पड़े तो screen reflection पैदा कर सकती है। Camera बहुत नीचे रखा जाए तो teacher का perspective natural नहीं दिखेगा। Wireless microphone की placement गलत हो तो expensive camera होने के बावजूद video amateur महसूस हो सकती है।
इसलिए studio setup को individual products की shopping list की तरह नहीं, system design की तरह देखना चाहिए।
Technical Yogi YouTube Studio Setup से मिलने वाला सबसे बड़ा Lesson
Technical Yogi का setup देखकर सबसे उपयोगी lesson यह नहीं है कि उन्होंने कौन-सा specific camera खरीदा। ज्यादा important यह है कि एक experienced creator अपनी shooting environment को intentionally design करता है।
Camera subject को capture करता है। Microphone voice को clear बनाता है। Lighting चेहरे और background को visual separation देती है। Tripod या mounting system framing को consistent रखता है। Background creator की visual identity बनाता है। Editing और recording workflow पूरे process को repeatable बनाता है।
अगर इन components में से एक कमजोर है, तो बाकी expensive equipment भी अपना पूरा impact नहीं दिखा पाता।
इसी principle को educational studio में थोड़ा आगे बढ़ाया जा सकता है। वहाँ camera, audio और lighting के साथ Digital Board, content display, screen capture, LMS और hybrid teaching भी ecosystem का हिस्सा बन जाते हैं।
Technical Yogi का 2026 Studio Video देखें
Technical Yogi का primary 2026 behind-the-scenes reference यहाँ देखा जा सकता है:
Technical Yogi – How I Shoot My YouTube Videos (Full Setup)
इस video को देखते समय सिर्फ gear names पर ध्यान देने के बजाय framing, camera distance, background, lighting direction, microphone placement और overall workflow observe करना ज्यादा useful होगा।
Camera: Professional YouTube Studio की आंख
Camera का काम सिर्फ high-resolution image देना नहीं है। उसे आपके content format के हिसाब से reliable framing और consistent image quality देनी चाहिए।
Talking-head YouTube creator के लिए camera requirement अलग हो सकती है, जबकि digital board के सामने चलकर पढ़ाने वाले teacher के लिए अलग। Podcast recording में दो या तीन fixed camera angles useful हो सकते हैं, जबकि hybrid classroom में wide shot और board visibility ज्यादा महत्वपूर्ण हो सकती है।
2026 में 4K recording useful है, लेकिन हर creator के लिए सिर्फ “4K” label देखकर camera select करना सही approach नहीं है। Sensor performance, autofocus, lens choice, HDMI output, continuous recording capability, heat management और studio integration भी महत्वपूर्ण factors हैं।
YouTube की official guidance के अनुसार standard desktop video के लिए 16:9 aspect ratio सामान्य format है और 4K UHD के लिए 3840×2160 resolution इस्तेमाल किया जाता है। YouTube यह भी recommend करता है कि content उसी frame rate पर upload किया जाए जिस frame rate में उसे record किया गया था।
इसलिए 4K/30fps में shoot किए गए educational lecture को बिना जरूरत 60fps में convert करना जरूरी नहीं है।
Fixed Camera या PTZ Camera?
एक seated YouTube creator के लिए fixed mirrorless या DSLR-style camera बहुत अच्छा solution हो सकता है। लेकिन teacher अगर board के सामने move करता है, classroom में अलग-अलग positions पर जाता है या live session करता है, तो PTZ camera अलग advantage दे सकता है।
PTZ का अर्थ Pan-Tilt-Zoom है। Suitable PTZ systems remote framing और movement-oriented studio workflow में useful हो सकते हैं। कुछ modern models tracking capabilities भी offer करते हैं।
Smart Infovision अपने current studio ecosystem में 4K PTZ cameras, Focus Plus cameras, webcams और complete teaching studio categories list करता है। उसके Noida Experience Center listing में 4K PTZ tracking camera को hybrid teaching, recording और live streaming environment के हिस्से के रूप में दिखाया गया है।
यहाँ महत्वपूर्ण बात फिर वही है: camera को feature list देखकर नहीं, use case देखकर चुनें।
अगर आप एक chair पर बैठकर technology videos बनाते हैं, fixed camera पर्याप्त हो सकता है। अगर आप 75-inch board के सामने mathematics पढ़ाते हुए लगातार move करते हैं, तो camera framing requirement अलग होगी।
Microphone: Viewer खराब Video सह सकता है, खराब Audio नहीं
Professional video में audio को अक्सर underestimate किया जाता है।
Viewer थोड़ी कम cinematic image के साथ useful lecture देख सकता है, लेकिन distorted, echo-heavy या बहुत low voice वाला lecture लंबे समय तक सुनना मुश्किल होता है।
Microphone selection content style के अनुसार होना चाहिए।
Standing teacher के लिए wireless collar या headset microphone convenient हो सकता है। Desk-based YouTube creator के लिए directional microphone या suitable lavalier setup अच्छा काम कर सकता है। Podcast environment में dedicated podcast microphone ज्यादा natural workflow दे सकता है।
Smart Infovision के current catalogue में wireless microphones, button microphones, podcast microphones और अन्य studio-oriented microphone categories listed हैं। Company product catalogue में Sennheiser wireless options, Benchmark podcast microphones, button wireless microphone और अन्य microphone choices भी दिखाई जाती हैं।
लेकिन microphone खरीदते समय brand से पहले room समझिए।
बहुत reflective room में expensive microphone भी unwanted room sound capture कर सकता है। Hard walls, empty ceiling और bare floor echo बढ़ा सकते हैं। Curtains, acoustic treatment और thoughtful microphone placement recording quality को significantly improve कर सकते हैं।
Lighting: Camera से पहले Light को समझिए
Professional-looking YouTube videos का secret कई बार camera से ज्यादा lighting होती है।
अगर subject properly lit है, skin tones natural हैं, background और subject के बीच separation है और shadows controlled हैं, तो mid-range camera भी अच्छा output दे सकता है।
इसके उलट expensive camera खराब lighting में flat या noisy result दे सकता है।
एक practical studio में key light subject को primary illumination देती है। Fill light harsh shadows को control करती है। Background या rim light visual depth create कर सकती है। Educational studio में board visibility के कारण light placement और भी महत्वपूर्ण हो जाती है।
Interactive Flat Panel के सामने light सीधे ऐसे angle पर नहीं होनी चाहिए जहाँ camera में distracting reflection दिखाई दे।
Anti-flicker lighting भी video production में महत्वपूर्ण हो सकती है, खासकर ऐसी situations में जहाँ shutter settings और local electrical frequency के कारण visible flicker का risk हो।
Smart Infovision अपने studio catalogue में anti-flicker lights और studio lighting solutions को camera, microphone और studio setup categories के साथ offer करता है।
पुराने और नए Studio Workflow को Compare करें
Technical Yogi का 2021 behind-the-scenes studio video भी useful reference है:
Technical Yogi – Behind the Scenes: Camera, Mic & Video Lights
2021 और 2026 के references को साथ देखने से creators यह समझ सकते हैं कि studio एक static purchase नहीं, बल्कि evolving production system होता है।
Smart Infovision Approach: Product बेचने से पहले Complete Workflow देखना
यहीं एक professional studio integrator की भूमिका शुरू होती है।
Smart Infovision अपने current website positioning में Digital Board, camera, audio, lighting और complete studio को एक integrated solution के रूप में present करता है। Company teaching, recording और content creation studios के लिए hardware, installation, training और support की बात करती है।
यह approach खासकर educational creators के लिए practical है क्योंकि teacher को दस अलग vendors से board, camera, microphone, light और installation coordinate करने की जरूरत कम हो सकती है।
एक studio consultation ideally room dimensions, content type, teaching style, expected student audience, live-streaming requirement, recording frequency, available budget और future expansion को देखकर शुरू होनी चाहिए।
इसके बाद equipment decide होना चाहिए।
यानी पहले workflow, फिर hardware।
Experience Center क्यों महत्वपूर्ण है?
Camera specifications online पढ़ी जा सकती हैं। Digital Board के RAM और Android version compare किए जा सकते हैं। Microphone की frequency response भी देखी जा सकती है।
लेकिन studio का वास्तविक experience spreadsheet में समझना मुश्किल है।
Teacher को Digital Board पर लिखकर देखना चाहिए। Camera में अपना framing देखना चाहिए। Microphone की आवाज सुननी चाहिए। Lighting के साथ board reflection check करना चाहिए। अगर PTZ camera लेना है तो tracking और framing practically test करनी चाहिए।
Smart Infovision की current Experience Center directory 14 locations दिखाती है, जिनमें Noida, Indore, Ranchi, Lucknow, Patna, Jaunpur, Bhagalpur, Ahmedabad, Jaipur, Pune, Varanasi, Mumbai, Kolkata और Muzaffarpur शामिल हैं। Company इन centers को Interactive Flat Panels, PTZ cameras और studio setups के live demonstration के लिए position करती है।
उदाहरण के लिए Indore Experience Center में Interactive Flat Panels, Digital Boards, PTZ cameras और complete studio setups के live demos उपलब्ध होने की जानकारी company website पर दी गई है।
Smart Infovision Experience Centers देखें
यही “try before you build” approach expensive mistakes कम करने में मदद कर सकती है।
Product Ecosystem: Studio केवल Camera + Mic + Light नहीं है
2026 में professional educational studio को सिर्फ तीन products तक सीमित करना सही नहीं होगा।
Complete ecosystem में Interactive Flat Panel, camera, microphone, lighting, OPS या recording computer, monitor, mounting solution, cables, internet connectivity, acoustic treatment, streaming software, LMS और content workflow शामिल हो सकते हैं।
Smart Infovision की current product range में Digital Boards, camera accessories, studio setups, microphones, OPS/computing solutions और accessories जैसी categories मौजूद हैं।
यही ecosystem approach future expansion को आसान बनाती है।
आज creator सिर्फ recorded videos बना सकता है। छह महीने बाद वह live classes शुरू कर सकता है। अगले साल coaching institute hybrid batch launch कर सकता है। इसलिए initial architecture ऐसा होना चाहिए कि upgrade के लिए पूरा studio दोबारा न बनाना पड़े।
Interactive Flat Panel: Modern Teaching Studio का Visual Center
Teacher-focused studio में Interactive Flat Panel यानी IFP सबसे महत्वपूर्ण components में से एक हो सकता है।
Traditional green board पर teacher लिख सकता है, लेकिन interactive panel teaching content को multimedia environment में बदल देता है।
PDF open करके उसी पर annotation किया जा सकता है। Diagram zoom किया जा सकता है। Presentation, browser, educational video और visual content एक ही screen पर इस्तेमाल किया जा सकता है। Compatible software environment में lesson material save और share भी किया जा सकता है।
Smart Infovision की current product page 65-inch, 75-inch और 86-inch Interactive Flat Panel options दिखाती है और 4K display, Android environment, multi-touch तथा optional Windows OPS जैसी capabilities list करती है। Specific feature availability model के अनुसार verify करनी चाहिए।
Digital Board और YouTube Studio का Combination
यहीं educational creator का setup traditional YouTuber से अलग हो जाता है।
Technical creator camera के सामने product explain कर सकता है। Teacher को equations, diagrams, maps, coding examples या charts explain करने पड़ सकते हैं।
Digital Board teacher को screen और presenter दोनों roles combine करने देता है।
अगर camera framing सही है तो viewer teacher और board दोनों देख सकता है। Screen capture integrate किया जाए तो detailed content भी clear दिख सकता है।
यही setup long-form YouTube lectures, recorded courses और hybrid classes के लिए powerful हो सकता है।
AI Teaching: Artificial Intelligence का सही Role क्या है?
2026 में “AI” शब्द लगभग हर technology product के साथ दिखाई देता है, लेकिन teacher के लिए important सवाल feature का नाम नहीं, उसका practical benefit है।
AI-enabled teaching workflow content preparation, handwriting recognition, annotation assistance, transcription, summaries, lesson organization, camera tracking और content repurposing जैसे areas में मदद कर सकता है।
लेकिन AI teacher का replacement नहीं है।
Teacher की subject knowledge, explanation style, student psychology की understanding और classroom judgment अभी भी central role निभाते हैं।
AI को assistant की तरह use करना ज्यादा sensible approach है।
Smart Infovision अपने कुछ Benchmark interactive panels को AI-enabled teaching features के साथ position करता है। Company के published installation examples में AI-assisted annotation, handwriting recognition और smart teaching tools जैसी capabilities describe की गई हैं। इन capabilities को खरीदने से पहले selected model पर live demo में verify करना बेहतर है।
AI Camera और Auto Tracking का Use
Traditional fixed camera में teacher को predefined frame के अंदर रहना पड़ सकता है।
अगर teaching style dynamic है और teacher board के एक corner से दूसरे corner तक move करता है, intelligent tracking camera useful हो सकता है।
AI या auto-tracking camera का goal cinematography दिखाना नहीं है। उसका सबसे बड़ा benefit operator dependency कम करना है।
एक solo teacher lecture record कर रहा हो तो हर movement के लिए cameraman रखना practical नहीं होगा। Tracking-compatible camera teacher को frame में रखने में मदद कर सकता है।
लेकिन यहाँ भी testing जरूरी है। Tracking speed, room size, board width, lighting और presenter movement real-world performance को प्रभावित कर सकते हैं।
Hybrid Classroom: एक Lecture, दो Audiences
Hybrid classroom का अर्थ केवल Zoom call चलाना नहीं है।
अच्छा hybrid classroom ऐसा होना चाहिए जहाँ physical classroom के students और remote students दोनों को understandable experience मिले।
Teacher board पर जो लिख रहा है वह remote viewer को clear दिखना चाहिए। Classroom question online students तक सुनाई देना चाहिए। Online student की interaction teacher तक पहुँचनी चाहिए। Recording बाद में revision के लिए उपलब्ध हो सकती है।
इसके लिए camera, microphone, display, computer, internet और software workflow का coordination जरूरी है।
Smart Infovision अपनी product और Experience Center pages पर hybrid teaching, online teaching और studio setups को integrated use cases के रूप में position करता है। Noida studio listing में Digital Board, 4K PTZ camera, wireless microphones, studio lighting और live-streaming encoder जैसे components एक ready-to-record environment में listed हैं।
Online Teaching Studio कैसे अलग है?
YouTube creator का primary objective viewer engagement हो सकता है। Online teacher का objective engagement के साथ readability और learning clarity भी है।
अगर mathematics equation screen पर readable नहीं है, तो cinematic background का कोई फायदा नहीं।
अगर chemistry diagram camera exposure के कारण wash out हो रहा है, तो expensive lighting भी सही काम नहीं कर रही।
अगर microphone teacher की voice clear capture करता है लेकिन board पर लिखते समय आवाज dramatically बदल जाती है, तो placement optimize करनी होगी।
इसलिए online teaching studio का design subject-oriented होना चाहिए।
Mathematics और Physics teachers को board space ज्यादा चाहिए। Coding instructor को screen capture priority चाहिए। Language educator को clean audio ज्यादा critical लग सकता है। Podcast educator को conversational seating और multi-mic setup चाहिए।
एक universal setup हर creator के लिए best नहीं होता।
LMS: Recording के बाद Content कहाँ जाएगा?
Studio workflow recording पर खत्म नहीं होना चाहिए।
Professional education business में अगला सवाल है: recorded content कहाँ organize होगा?
यहीं Learning Management System यानी LMS महत्वपूर्ण हो जाता है।
LMS courses, modules, recorded lectures, assignments, quizzes, student access और progress management के लिए centralized environment दे सकता है। Exact capabilities platform पर depend करती हैं।
Studio और LMS का relationship simple है।
Studio content बनाता है। LMS content deliver और organize करता है।
अगर recording workflow structured हो तो educator एक lecture को YouTube के public version, LMS के detailed lesson, Shorts snippets और social-media clips में repurpose कर सकता है।
इससे एक recording session multiple content assets में बदल सकता है।
Branding: Background भी Content का हिस्सा है
Studio background को केवल decoration समझना गलती है।
Viewer कई videos देखने के बाद आपके visual environment को पहचानने लगता है। Consistent background, lighting pattern, logo placement और framing brand recall build कर सकते हैं।
लेकिन branding का अर्थ हर wall पर logo लगाना नहीं है।
Clean background, controlled depth, subtle brand elements और subject separation ज्यादा professional दिख सकते हैं।
Teacher-focused studio में Digital Board खुद visual anchor बन सकता है। Podcast setup में table, microphones और controlled practical lights visual identity बना सकते हैं। Technology channel में product display area useful हो सकता है।
Technical Yogi जैसे established creators के studio evolution से यही broader lesson मिलता है कि environment creator identity का हिस्सा बन जाता है।
Audio Treatment और Sound Quality
Microphone खरीदने के बाद अगला investment कई बार दूसरा microphone नहीं, बल्कि room improvement होना चाहिए।
Empty room में hard surfaces आवाज को reflect करती हैं। इससे echo और reverb बढ़ सकता है।
Curtains, rugs, furniture और purpose-built acoustic materials room behavior improve कर सकते हैं। Professional studios में acoustic treatment room dimensions और recording requirement के अनुसार plan किया जाता है।
Smart Infovision के कुछ ready-to-record Experience Center listings sound treatment या professional acoustics को setup का हिस्सा बताते हैं। उदाहरण के लिए Bhopal listing में digital board, 4K camera, wireless collar mic, softbox lighting और sound treatment listed हैं, जबकि Noida flagship studio professional acoustics को mention करता है।
यह याद रखना जरूरी है कि acoustic treatment और soundproofing एक ही चीज नहीं हैं। Acoustic treatment room के अंदर sound reflections manage करता है, जबकि sound isolation बाहरी noise को अंदर या अंदर की आवाज को बाहर जाने से रोकने से संबंधित है।
YouTube के लिए Recording और Export Settings
Professional studio से अच्छा footage capture करने के बाद गलत export settings quality को नुकसान पहुँचा सकती हैं।
YouTube की current recommended upload settings MP4 container और H.264 video codec को support करती हैं। Platform recorded frame rate को preserve करने की सलाह देता है। SDR content के लिए 1080p standard-frame-rate uploads का recommended bitrate 8 Mbps और 4K का 35–45 Mbps बताया गया है। High-frame-rate content के लिए recommended values अधिक हैं।
Standard desktop YouTube viewing के लिए 16:9 aspect ratio common है। 1080p के लिए 1920×1080 और 4K के लिए 3840×2160 resolution standard references हैं। YouTube different aspect ratios को automatically adapt भी करता है।
इसलिए recording से पहले ही तय करें कि content long-form YouTube के लिए है, Shorts के लिए है या दोनों के लिए।
अगर एक ही session से horizontal और vertical content निकालना है तो framing में crop-safe area पहले से plan करना समझदारी होगी।
Live Streaming में Internet और Encoder क्यों महत्वपूर्ण हैं?
Recorded video में network failure का impact नहीं पड़ता, लेकिन live class में internet production chain का हिस्सा बन जाता है।
YouTube अपनी live-streaming guidance में resolution और frame rate के अनुसार encoder bitrate configure करने तथा stream शुरू करने से पहले upload capability test करने की सलाह देता है। Platform यह भी recommend करता है कि test में actual stream जैसी audio और movement conditions शामिल हों।
इसका practical मतलब यह है कि केवल “100 Mbps internet” लिखे plan पर भरोसा नहीं करना चाहिए।
Actual upload stability, wired connection, router quality, backup connectivity और streaming PC performance test करनी चाहिए।
Professional live class में redundancy luxury नहीं, continuity planning है।
Smart Infovision Experience Center पर क्या Test करना चाहिए?
अगर आप professional studio पर significant investment करने जा रहे हैं, तो brochure देखकर final decision न लें।
अपने actual use case का छोटा simulation करें।
Digital Board पर वही PDF खोलें जिसे आप रोज पढ़ाते हैं। Mathematics equation लिखकर latency महसूस करें। Camera के सामने board के left और right side move करके framing देखें। Microphone पहनकर normal teaching volume में बोलें। Lighting के साथ screen reflection देखें। Windows OPS की जरूरत हो तो अपने regular software run करके देखें।
अगर live classes आपकी priority हैं तो OBS या दूसरे required workflow की compatibility check करें।
इस practical testing का उद्देश्य specification verify करना ही नहीं, बल्कि यह देखना है कि setup आपके teaching behavior के साथ comfortable है या नहीं।
Smart Infovision Studio Setup Solutions देखें
Company की current site के अनुसार Experience Centers पर real installations और studio equipment demonstrations उपलब्ध हैं।
Mid-Blog CTA: अपना Studio खरीदने से पहले Live Demo लें
अगर आप teacher, coaching institute, YouTube educator, college, university या EdTech company हैं और camera, mic, lighting, Digital Board तथा recording workflow को अलग-अलग खरीदने के बजाय एक complete setup के रूप में evaluate करना चाहते हैं, तो पहले live demonstration लेना बेहतर decision हो सकता है।
अपने nearest Smart Infovision Experience Center पर Interactive Flat Panel, PTZ camera, microphone और studio workflow practically test करें। Company अपनी current directory में 14 Experience Centers और free live demos promote करती है।
Beginner Creator को किस क्रम में Studio Upgrade करना चाहिए?
सबसे पहले content clarity और audio पर focus करें।
उसके बाद lighting और consistent camera framing improve करें। जब content production regular होने लगे, permanent background और dedicated recording area useful हो सकते हैं।
Educational creator के लिए next stage Digital Board या Interactive Flat Panel हो सकता है। Live teaching बढ़ने पर PTZ camera, wireless microphone, OPS/PC, encoder और hybrid-classroom workflow add किया जा सकता है।
यह approach budget को एक साथ unnecessary equipment में lock करने से बचाती है।
Technical Yogi के पुराने और नए studio references भी indirectly यही बताते हैं कि creator setup समय के साथ evolve होता है।
2026 और आगे YouTube Studio का Future
आने वाले studio का सबसे बड़ा बदलाव सिर्फ better cameras नहीं होंगे।
Automation ज्यादा महत्वपूर्ण होगी।
AI-assisted camera tracking, automatic transcription, smart editing, background processing, searchable lecture libraries, multilingual captions, content summaries और one-to-many content repurposing creator workflow का हिस्सा बनते जाएंगे।
Educational studio में Interactive Flat Panel और AI tools का integration भी बढ़ सकता है।
लेकिन future-ready studio का मतलब हर नया AI product खरीदना नहीं है।
Future-ready setup वह है जो modular हो।
Camera बदला जा सके। Microphone upgrade किया जा सके। OPS replace हो सके। Software update हो सके। New platform integrate हो सके।
इसलिए infrastructure और compatibility long-term purchase decisions में feature hype से ज्यादा important हैं।
Technical Yogi Setup को Copy करें या उससे सीखें?
सीधे copy करना जरूरी नहीं है।
एक established technology creator की recording needs और एक NEET teacher की requirements अलग होंगी। Podcast host की requirements अलग होंगी। Coaching institute का use case फिर अलग होगा।
Technical Yogi का studio reference आपको professional creator mindset समझने में मदद करता है: dedicated camera, controlled audio, deliberate lighting और repeatable workflow।
आपको उस mindset को अपने use case पर apply करना है।
यही smart studio planning है।
Frequently Asked Questions
Technical Yogi कौन-सा YouTube Studio Setup इस्तेमाल करते हैं?
Technical Yogi ने जनवरी 2026 में अपने official YouTube channel पर complete home studio shooting workflow दिखाया है जिसमें camera, microphone, lights और studio workflow शामिल हैं। Exact equipment model के लिए creator के current video और description को primary reference मानना चाहिए क्योंकि gear समय के साथ बदल सकता है।
Technical Yogi YouTube Studio Setup beginners के लिए useful reference क्यों है?
यह setup beginners को यह समझने में मदद करता है कि professional YouTube video केवल camera से नहीं बनती। Camera, microphone, lighting, background और repeatable workflow साथ मिलकर final production quality बनाते हैं।
YouTube Studio के लिए 4K Camera जरूरी है?
हर creator के लिए जरूरी नहीं। अच्छी lighting, clean audio और proper framing कई बार resolution से ज्यादा visible improvement देते हैं। लेकिन educational boards, detailed demonstrations और future cropping requirements में 4K useful हो सकता है। YouTube 3840×2160 को standard 4K 16:9 resolution के रूप में list करता है।
YouTube के लिए Camera या Microphone में पहले investment करना चाहिए?
अगर existing camera acceptable image दे रहा है लेकिन audio खराब है, तो microphone और room audio improvement ज्यादा noticeable हो सकता है। Purchase priority existing bottleneck के आधार पर तय करनी चाहिए।
Teacher के लिए Normal Camera या PTZ Camera बेहतर है?
Fixed-position teaching या seated videos में normal camera पर्याप्त हो सकता है। Board के सामने movement, hybrid teaching या operator-free recording में suitable PTZ/auto-tracking solution useful हो सकता है। Final selection room और workflow demo के बाद करना बेहतर है।
Digital Board YouTube Studio में क्यों useful है?
Digital Board teacher को लिखने, PDF annotate करने, presentations दिखाने और multimedia explain करने के लिए एक large interactive surface देता है। Camera और recording system के साथ integrate करने पर वही environment offline और online teaching दोनों में इस्तेमाल किया जा सकता है।
क्या Interactive Flat Panel और Digital Board एक ही हैं?
Market में “Digital Board” शब्द अक्सर Interactive Flat Panel के लिए loosely इस्तेमाल होता है। Technically product specifications brand और model के अनुसार अलग हो सकती हैं, इसलिए touch technology, operating system, display size, ports, OPS support और warranty individually verify करनी चाहिए।
75-inch Digital Board किसके लिए useful है?
Medium-to-large teaching environments में 75-inch size popular option हो सकता है, लेकिन ideal size viewing distance, room dimensions और student count पर depend करता है। Purchase से पहले live demo और room assessment करना बेहतर है।
YouTube Studio में lighting कैसे plan करनी चाहिए?
Subject पर controlled primary light, shadow management और background separation पर focus करें। Digital Board वाले studio में reflection और flicker भी check करें। Light placement camera position और screen angle के साथ test करनी चाहिए।
Online Teaching Studio और YouTube Studio में क्या अंतर है?
YouTube studio visual presentation और content production पर केंद्रित हो सकता है, जबकि online teaching studio में board readability, screen sharing, live interaction, recording, LMS workflow और hybrid students की जरूरतें भी शामिल होती हैं।
Smart Infovision Experience Center में क्या देख सकते हैं?
Company की current Experience Center pages Interactive Flat Panels, Digital Boards, PTZ cameras और complete studio setups के live demonstrations promote करती हैं। Availability location के अनुसार confirm करनी चाहिए।
क्या AI Camera teacher को automatically track कर सकता है?
कुछ PTZ/AI camera models auto-tracking capabilities offer करते हैं। Tracking behavior और supported modes model-specific होते हैं, इसलिए actual classroom movement के साथ live demonstration करना चाहिए।
Studio के लिए LMS जरूरी है?
सिर्फ YouTube videos publish करने वाले creator के लिए LMS जरूरी नहीं है। Paid courses, structured batches, quizzes, student access और organized learning paths चलाने वाले educators के लिए LMS useful हो सकता है।
क्या एक ही Studio से YouTube, Online Classes और Recorded Courses बनाए जा सकते हैं?
सही architecture होने पर हाँ। Camera, audio, lighting, Digital Board, computer और software workflow को multi-purpose use के लिए plan किया जा सकता है।
YouTube के लिए 1080p अभी भी पर्याप्त है?
कई use cases में 1080p practical resolution है। YouTube 1920×1080 को standard 16:9 HD resolution के रूप में support करता है। Detailed educational content, large displays या cropping-heavy workflow में 4K का अतिरिक्त benefit हो सकता है।
निष्कर्ष: Professional Studio Gear से नहीं, System से बनता है
Technical Yogi YouTube Studio Setup का सबसे valuable lesson किसी एक camera, mic या light का नाम नहीं है। असली lesson है कि successful content production में camera, clean audio, controlled lighting, background और workflow एक साथ काम करते हैं।
Teachers और educational creators के लिए इस ecosystem में एक और layer जुड़ती है—Interactive Flat Panel, Digital Board, AI/PTZ camera, online teaching software, LMS और hybrid classroom infrastructure।
इसलिए 2026 में studio बनाते समय सिर्फ “best camera” या “best digital board” search करने के बजाय complete workflow plan करें।
Room देखें। Content format समझें। Camera framing test करें। Microphone सुनें। Lighting में board reflection check करें। Digital Board पर खुद लिखें। Live streaming workflow run करें। उसके बाद investment करें।
अगर आप professional YouTube Studio, Online Teaching Studio, Hybrid Classroom या Digital Board setup plan कर रहे हैं, तो Smart Infovision के Experience Center पर live demo लेकर camera, mic, lighting और Interactive Flat Panel को एक integrated workflow में compare कर सकते हैं। Company वर्तमान में pan-India Experience Center network और complete studio solutions promote करती है।